728x90
📚 2023 10-26 [ 프로필 만들기 ]

부트캠프 수업 마치고 카페에서 혼자서 CSS를 활용해서 프로필을 간단하게 만들어 봤다.
만들고자 하는 프로필이다.

📌
HTML 코드
<!DOCTYPE html>
<html lang="en">
  <head>
    <meta charset="UTF-8" />
    <meta name="viewport" content="width=device-width, initial-scale=1.0" />
    <title>프로필 만들어보기</title>
    <link rel="stylesheet" href="./indexresult.css" />
  </head>
  <body>
    <div class="main-box">
      <div class="main-container">
        <div class="container">
          <img src="./페페.jpg" alt="" />
          <p>MetaMask</p>
          <p>@metaMask</p>
          <p>Lorem ipsum dolor sit amet consectetur</p>
          <i class="fa-brands fa-html5"></i>
          <i class="fa-brands fa-css3-alt"></i>
          <i class="fa-brands fa-square-js"></i>
          <i class="fa-solid fa-envelope"></i>
        </div>

        <div class="second-box">
          <span> 6/8 Organizations</span>
          <i class="fa-solid fa-info"></i>
          <div class="hidden">
            <div></div>
          </div>
          <div class="follow">
            <p><span>4K</span> Followers</p>
            <button>Follow</button>
          </div>
        </div>
      </div>
    </div>
  </body>
  <script
    src="https://kit.fontawesome.com/6206d712ce.js"
    crossorigin="anonymous"
  ></script>
</html>
📌
CSS 코드
html {
  background-color: gray;
}
body {
  height: 100%;
}
.main-box {
  display: flex;
  width: 100%;
  height: 100vh;
  display: flex;
  justify-content: center;
  align-items: center;
}

.main-container {
  width: 630px;
  height: 238px;
  background-color: #fef2ce;
  border-radius: 25px;
  display: flex;
  padding: 28px;
}

.main-container div img {
  width: 58px;
  height: 58px;
  border-radius: 20px;
}
.main-container div p:nth-child(2) {
  font-size: 20px;
  font-weight: bold;
}

.container {
  width: 100%;
}

.container p {
  margin: 5px 0px 0 0;
  font-size: 15px;
}

.container i {
  margin-top: 12px;
  margin-right: 10px;
  font-size: 20px;
  background-color: white;
  color: black;
  text-align: center;
  /* 세로 중앙 정렬을 위해 추가 */
  line-height: 40px;
  width: 40px;
  height: 40px;
  border-radius: 15px;
}

.second-box {
  margin-top: 58px;
  margin-left: 200px;
  position: relative;
}

.second-box i:nth-child(2) {
  margin-left: 40px;
  border: 1px solid;
  font-size: 11px;
  text-align: center;
  line-height: 15px;
  border-radius: 50%;
  width: 15px;
  height: 15px;
}

.hidden {
  margin-top: 10px;
  width: 200px;
  height: 10px;
  background-color: #ddd;
  position: relative;
  overflow: hidden;
  padding: 0px;
  border-radius: 40px;
}

.hidden div {
  height: 100%;
  width: 70%;
  background-color: orange;
  padding: 0px;
}

.follow {
  position: absolute;
  bottom: 0;
  right: 0;
  display: inline-block;
  text-align: right;
}

.follow button {
  background-color: #13143b;
  color: white;
  padding: 10px 45px;
  border-radius: 10px;
}

.follow p {
  margin-bottom: 15px;
}

.follow p span {
  font-size: 20px;
  font-weight: bold;
}
📌
결과물
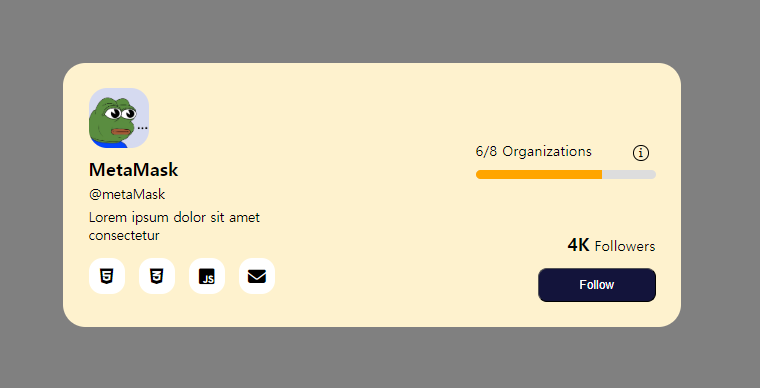
프로필에 있는 아이콘은 Font Awesome에서 검색하여 활용했다. 게이지 바 만들기가 살짝 힘들었다.
중간중간 결과물만 보고 만들다 보니 완성 후, CSS 코딩을 봤는데 너무 🐕판으로 작성 되어있었다..
어디서부터 고쳐나가야 할지 정말 난감한 상황에 챗 GPT에게 물어봤다... ^^;;


챗 GPT를 통한 최적화 된 코드와 내가 만든 코드를 비교해 봤는데 정말 많은 부분을 변경해 줬다.
내 코드와 챗 GPT가 최적화 해준 코드를 분석해 봤는데... 내 코드는 가독성이 너무 최악이었다.
검색을 하고 생각을 해보니 CSS로 디자인할 경우 구역을 나눠서 박스로 묶은 후 디자인을 하면 뭔가 좀 편할 거 같은 생각이 들었다. 앞으로는 구역을 나눠서 디자인을 해보도록 하자.
- Font Awesome
Font Awesome
The internet's icon library + toolkit. Used by millions of designers, devs, & content creators. Open-source. Always free. Always awesome.
fontawesome.com
Font Awesome 사용법은 구글에 치면 친절하게 설명이 많이 나와있으니 생략하도록 하겠다. 😃
728x90
'Front-end Developer > CSS' 카테고리의 다른 글
| HTML, CSS 사용하여 UICARD 만들기 (2) (0) | 2023.10.30 |
|---|---|
| HTML, CSS 사용하여 UICARD 만들기 (2) | 2023.10.29 |
| HTML, CSS 사용하여 프로필 만들기(3) (0) | 2023.10.28 |
| HTML과 CSS로 프로필 만들기 (0) | 2023.10.27 |
| [CSS] calc() 함수 사용법 (0) | 2023.10.27 |


